Automate your Salesforce Deployments with GitHub Actions
Table of Contents
Streamline your Salesforce release pipeline.

Using the right tools #
There are many tutorials that cover creating GitHub Actions for Salesforce. This article’s intention is to cover a few gaps and ensure release managers are using the best available tools.
- Use newer
sf-cliover the deprecatedsfdx-cli(announcement) - Utilize new
sfdx-url-stdinauthorization method from sf-cli Release 2.24.4 (implemented by yours truly) - Enforce release process with branch protections
CI/CD in Salesforce #
Continuous integration and continuous delivery/deployment (CI/CD) describes the process by which software development teams quickly develop and deploy applications. In the world of Salesforce, this means being able to automate testing and deployments from scratch orgs (and sandboxes) all the way up to production.
GitHub Actions are a powerful way to automate CI/CD processes by triggering workflows based off of events (like opening a pull request) in a GitHub repository. Read more about GitHub Actions.
The sf-cli is Salesforce’s powerful new command line interface that supports running tests, deploying metadata, and more. Workflows can automatically run these commands so that developers don’t have to manually execute deployments. This helps enable source-driven development by designating version control as the source of truth.
Creating a workflow using GitHub Actions #
By the end of this tutorial you should have the following configurations to power your Salesforce releases:
- A workflow to validate metadata when a pull request is opened
- A workflow to deploy metadata when a release is created
- Branch protections to ensure code must be successfully validated before merged
The source code used for this tutorial can be found here:
https://github.com/k-capehart/sfdc-github-actions
What you need #
This article assumes that you have basic knowledge of Salesforce and working within a git repository. Here are a few prerequisites, all entirely free.
- Salesforce Developer Edition org
- GitHub account
- Salesforce Command Line Interface
- If you are using the old
sfdx-cli, upgrade to the newsf-cli
- If you are using the old
- Visual Studio Code with Salesforce Extension Pack
- Learn how to setup your Salesforce Developer Environment in VS Code
1. Setup #
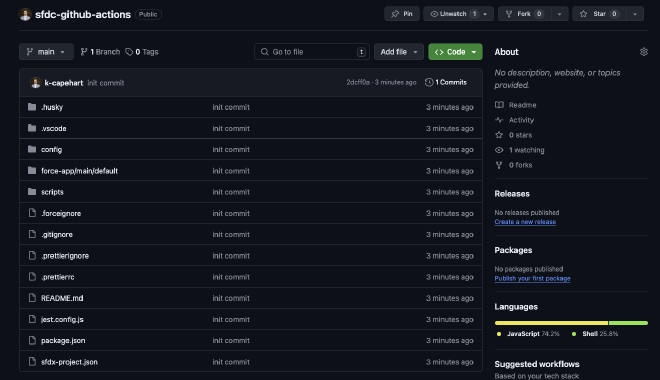
This assumes that you already have a Salesforce project created and setup in Visual Studio Code. Review the prerequisites above if not. A fresh Salesforce project should look something like this in GitHub.
2. SFDX Authorization URL #
A GitHub workflow must be able to authenticate to an org in order to deploy metadata. In a production environment, a Service User should be used so that permissions are properly delineated.
Ensure that you are authenticated to the target Salesforce org.sf org login web
Once connected, you will need the SFDX Authorization URL.sf org display --verbose
The output will display sensitive information regarding your Salesforce org. This should never be shared. Fortunately, GitHub provides a simple way to securely store tokens that can be accessed from workflows.
First, copy the value for Sfdx Auth Url from the output of the previous command.
In your GitHub repository, go to “Settings” then “Secrets and variables” and “Actions”.
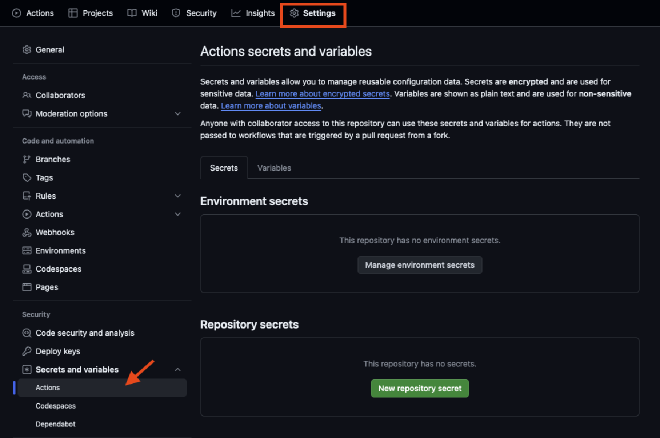
Click on “New repository secret”. Note that Environment secrets can also be created to manage credentials for different Salesforce environments.
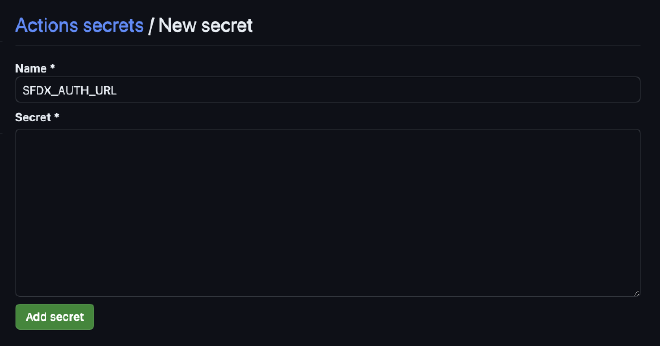
Name the secret SFDX_AUTH_URL, then paste the Sfdx Auth Url value from the output of sf org display --verbose into the secret. Then click “Add secret”.
3. Create validation workflow #
At the root of your VS Code project, create a directory and sub directory: .github/workflows/.
Within the new workflow/ directory create a new file: validate.yaml.
Your folder structure in VS Code should now look something like this.

Paste the following code into validate.yaml.
name: Validate pull request

on:
  pull_request:
    branches:
      - main
    types: [opened, synchronize]
    paths:
      - 'force-app/**'

jobs:
  validate-deployment:
    runs-on: ubuntu-latest
    container:
      image: salesforce/cli:latest-slim
    steps:
      - name: 'Checkout source code'
        uses: actions/checkout@v4
        with:
          fetch-depth: 0

      - name: 'Authenticate using SFDX_AUTH_URL'
        run: |
          echo ${{ secrets.SFDX_AUTH_URL }} | sf org login sfdx-url -s -u

      - name: 'Validate'
        run: |
          sf project deploy validate -d force-app/ -l RunLocalTests -w 30
Let’s break this down.
name: Validate pull request

on:
  pull_request:
    branches:
      - main
    types: [opened, synchronize]
    paths:
      - 'force-app/**'
This names the workflow “Validate pull request” and defines it to be triggered on the following events:
- a pull request is opened against the main branch
- a pull request against the main branch is updated to reflect new changes
It also limits the detected changes to the force-app/ file path, which is where deployable metadata is located in a Salesforce project. That way validations aren’t triggered if an update is made to any other component, like the README.
jobs:
  validate-deployment:
    runs-on: ubuntu-latest
    container:
        image: salesforce/cli:latest-slim
This creates a new job called validate deployment which runs in a Ubuntu virtual machine. The runner includes an image of the latest version of the salesforce/cli. This allows the job to execute sf commands.
    steps:
      - name: 'Checkout source code'
        uses: actions/checkout@v4
        with:
          fetch-depth: 0
The first step within the job is to use an action to checkout the source code. This allows the workflow to access the files in the repository. fetch-depth: 0 lets it fetch the entire commit history.
      - name: 'Authenticate using SFDX_AUTH_URL'
        run: |
          echo ${{ secrets.SFDX_AUTH_URL }} | sf org login sfdx-url -s -u
Next, the workflow authenticates into the target environment.
echo ${{ secrets.SFDX_AUTH_URL }} |- access the SFDX_AUTH_URL secret and pipe it into the next commandsf org login sfdx-url- authorize an org using a Salesforce DX authorization URL-s- set the org as the default that all org-related commands run against-u- indicates that the authorization URL will be piped in
Read more about authentication using the SFDX Authorization URL.
      - name: 'Validate'
        run: |
          sf project deploy validate -d force-app/ -l RunLocalTests -w 30
Finally, validate the metadata against the target environment.
sf project deploy validate- validate a metadata deployment without actually executing it-d force-app/- path to the source files to be deployed-l RunLocalTests- all tests in your org are run, except tests from packages-w 30- wait 30 minutes to finish before displaying results
4. Create release workflow #
Create a new file in .github/workflows/: release.yaml.
Paste the following code into release.yaml.
name: Deploy project

on:
  release:
    types: [published]

jobs:
  deploy-release:
    runs-on: ubuntu-latest
    container:
      image: salesforce/cli:latest-slim
    steps:
      - name: 'Checkout source code'
        uses: actions/checkout@v3
        with:
          fetch-depth: 0

      - name: 'Authenticate using SFDX_AUTH_URL'
        run: |
          echo ${{ secrets.SFDX_AUTH_URL }} | sf org login sfdx-url -s -u

      - name: 'Deploy'
        run: |
          sf project deploy start -d force-app/ -l RunLocalTests -w 30
This is almost identical to validate.yaml but with a couple key differences.
name: Deploy project

on:
  release:
    types: [published]
This names the workflow “Deploy project” and defines it to be triggered on the following event:
- a release is published
      - name: 'Deploy'
        run: |
          sf project deploy start -d force-app/ -l RunLocalTests -w 30
sf project deploy start- deploy metadata to an org from your local project-d force-app/- path to the source files to be deployed-l RunLocalTests- all tests in your org are run, except from packages-w 30- wait 30 minutes to finish before displaying results
Once complete, push the workflows to your GitHub repository.git add .git commit -m "create new workflows for salesforce deployments"git push
5. Testing the workflows #
Open a pull request #
In a real working environment, development might be done in a scratch org, then pushed to GitHub so that changes can be deployed to a shared sandbox. However, that isn’t strictly necessary for this tutorial.
Checkout a new branch to hold your changes.git checkout -b test-workflows
Make a simple change, like creating a blank Apex Class.sf apex generate class -n TestApexClass -d force-app/main/default/classes
Commit your changes and push to the branchgit add .git commit -m "test new github workflow"git push -u origin test-workflows
In GitHub, create a new Pull Request, merging the test-workflows branch with the main branch.

You should see the Validate job begin to run.

Once complete, the pull request can be merged.
Create a release #
In your GitHub repository, click on “Releases”, then “Create a new release”.
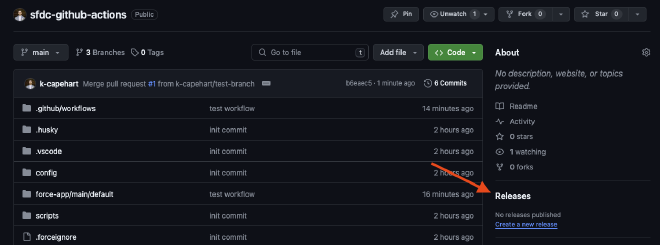

Choose a tag, generally a release number (such as 0.0.1), then click “Generate release notes”. Finally, click “Publish release”.
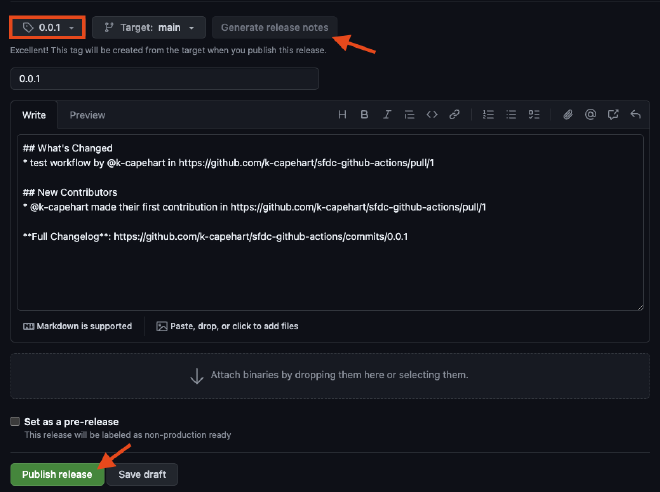
The release workflow is now running, and can be monitored under the “Actions” tab.

Once complete, the Apex class will have deployed to your Salesforce org.
6. Setup branch protections #
The workflows will now be available in your repository and will run whenever a pull request or release is created. However, validations work best when they are enforced. GitHub repositories can be setup with branch protections to ensure workflows pass before a pull request is merged.
In your GitHub repository, go to “Settings” then “Branches”. Then click “Add branch protection rule”.
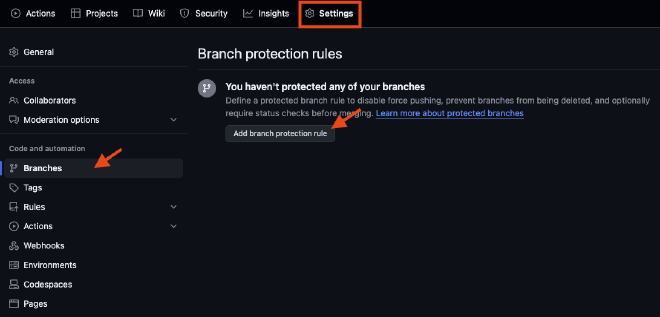
Fill out the following:
- Branch name pattern: main
- Require a pull request before merging
- optional: Require approvals
- Require status checks to pass before merging
- Require branches to be up to date before merging
- validate-deployment
- Require branches to be up to date before merging
- Do not allow bypassing the above settings

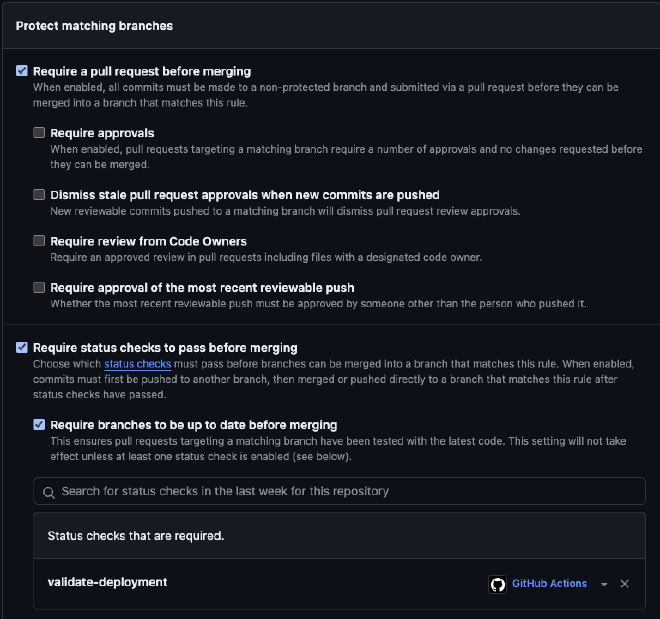
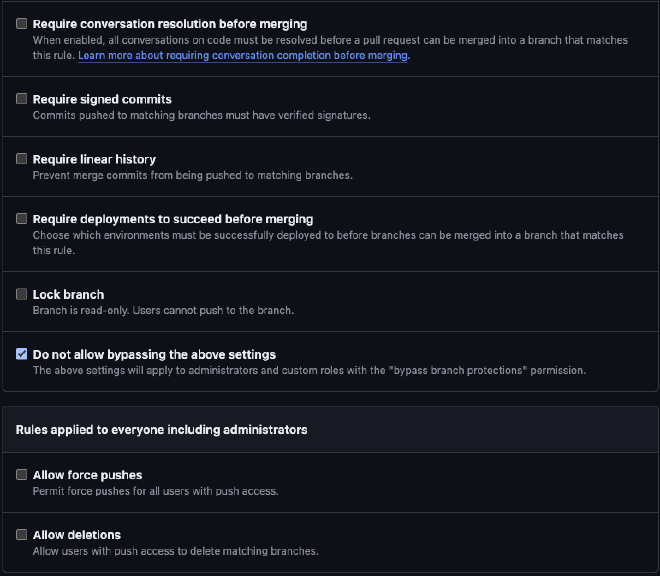
Finally, click “Create” to enable the new branch protections. GitHub now prevents commits being directly pushed to main, and Salesforce validations must successfully pass before a pull request can be merged.
Conclusion #
Salesforce supports many options for automating deployments, and the right solution will depend on a variety of factors. GitHub Actions empower developers to quickly and efficiently spin up pipelines, so that everyone is always on the same page before a new release. Modifications to the workflow can easily be made to adapt to more complicated requirements. To enable deployments to multiple sandbox environments, look into GitHub Action environments.
Comments or questions? Send me a message